Module 5
A Key Driver Diagram (KDD) is a structured, visual roadmap that connects:
- Your AIM Statement: what you want to accomplish
- Key Drivers: the major factors that influence whether you'll succeed
- Primary drivers: the big, high-level conditions directly under your AIM — too broad to tackle with just one or two change ideas.
- Secondary drivers: the more specific components underneath a primary driver — concrete enough to attach real change ideas to.
- Change Ideas: specific, testable actions you can try
Think of the KDD as your team’s “north star” for complex improvement work.
See It in Action
Before we break down each part on its own, take a look at a completed KDD below. It uses the ED telepsychiatry consult line setup as the example — the same scenario from your Swiss Cheese worksheet — so you can see the same project take shape across tools.
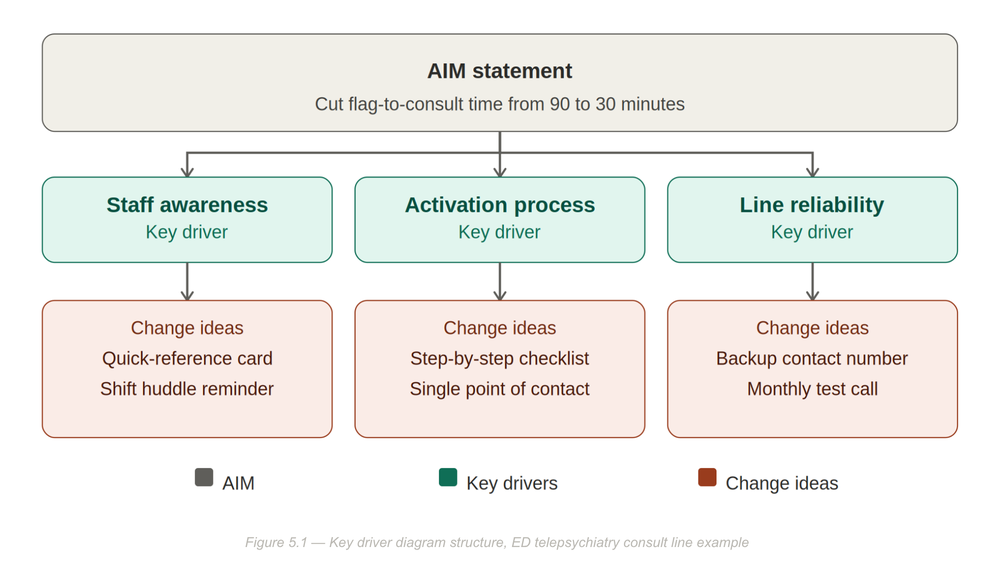
As you look at the diagram, connect each box back to the definitions above:
- The gray box at the top is the AIM statement — the single result the team is aiming for.
- The three teal boxes are the key drivers — conditions, not actions, like “Staff awareness” and “Line reliability.” That's what separates a driver from a change idea.
- The coral boxes underneath each driver are the change ideas — concrete, testable actions tied to that driver, where PDSA starters live.
💡Why the Connections Matter: Every change idea should trace back through its driver to the AIM. If you can't draw that line, revisit the diagram before testing the change — the KDD only works when the connections hold up.
This is a simplified example — real KDDs often have more drivers and more change ideas under each one. But the shape is always the same: one AIM at the top, a handful of drivers underneath it, and a few concrete things to try under each driver.
Zooming In: Primary and Secondary Drivers
The three drivers in Figure 5.1 — Staff awareness, Activation process, and Line reliability — are all primary drivers. When a primary driver is still too broad to test directly, teams break it into secondary drivers first. Here's what that looks like when we zoom in on Activation process:
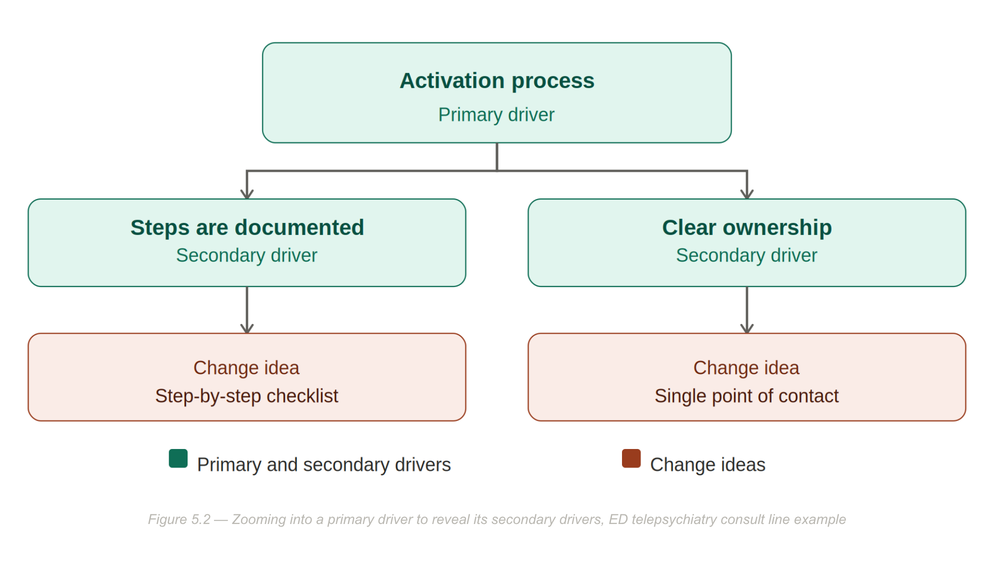
Notice what changed: the checklist and single point of contact now each sit under their own secondary driver — “Steps are documented” and “Clear ownership” — instead of directly under Activation process. Not every primary driver needs this extra layer. If a primary driver is already narrow enough for change ideas directly — like Line reliability — leave it alone. Add secondary drivers only when a primary driver is too broad to test as-is.
The chain still has to hold. Change idea → secondary driver → primary driver → AIM. If you can't trace it, revisit the diagram.
As before, this is a simplified example — real KDDs typically have more drivers and change ideas, but the same basic shape holds.